| วันที่ 12 มีนาคม พ.ศ. 2554 ปีที่ 20 ฉบับที่ 7408 ข่าวสดรายวัน จับพ.ต.ท.แก๊งเรียกค่าไถ่รถจำนำ เมื่อ วันที่ 11 มี.ค. พ.ต.อ.เกษมศักดิ์ หะซะนี รอง ผบก.ภ.จว.อุบลราชธานี ได้ขอศาลจังหวัดอุบลราชธานี ออกหมายจับผู้ร่วมในขบวนการเพิ่มอีก 6 คน รวมเป็น 8 ราย โดยหนึ่งในผู้ต้องหาที่ถูกออกหมายจับมี พ.ต.ท.โอภาส ไหมแพง สว.สส.สภ.ห้วยขยุง อ.วารินชำราบ จ.อุบลราชธานี รวมอยู่ด้วย ตามหมายจับของศาลจังหวัดที่ จ.109/2554 ลงวันที่ 10 มี.ค.ข้อหาเป็นซ่องโจรเพื่อร่วมกันฉ้อโกงทรัพย์ ต่อมาพ.ต.ท.โอภาส ได้เดินทางเข้าพนักงานสอบสวน สภ.เมืองอุบลราชธานี พร้อมให้การภาคเสธว่า รู้จักคนในกลุ่มที่ถูกออกหมายจับ แต่ไม่เกี่ยวข้องขบวนการด้วย เจ้าหน้าที่สอบสวนปากคำนาน 1 ชั่วโมง จากนั้นได้นำตัวพ.ต.ท.โอภาสไปขออำนาจศาลฝากขังพร้อมคัดค้านการประกันตัว เพราะเกรงจะทำให้เสียรูปคดี ด้านพ.ต.อ.เกษมศักดิ์เปิดเผยว่า การจับกุมแก๊งรับจำนำรถรายนี้เนื่องจากได้รับการร้องเรียนจากประชาชนภาค อีสานใต้ มีคนมาขอเช่าซื้อรถหรือขอเช่าเป็นรายวันและรายเดือน จากนั้นนำรถไปจำนำกับนายหน้ารับจำนำในตัวเมืองอุบลราชธานี เพื่อเอาเงินส่วนต่างไปเล่นการพนันในบ่อนกัมพูชาหรือเล่นพนันออนไลน์ ทำให้เจ้าของรถที่ถูกเช่ารถมาได้รับความเดือดร้อน ต้องติดตามขอไถ่รถคืนจากแก๊งรับจำนำเป็นมูลค่าสูงคันละ 2-3 แสนบาท ต่อ มาชุดสืบสวนเข้าจับกุมผู้ต้องหารายแรกได้ 2 คน นำตัวมาขยายผลกระทั่งจับน.ส.ทัศนีย์ วันทา อายุ 37 ปี สอบปากคำผู้ต้องหาและผู้เสียหายให้การเชื่อมโยงถึงพ.ต.ท.โอภาส เป็นผู้ติดต่อนำรถที่คนร้ายนำมาจำนำกลับคืนให้เจ้าของรถ แต่ต้องเสียค่าใช้จ่ายเป็นเงินค่าไถ่รถ รวมทั้งดอกเบี้ยและค่าดำเนินการตามสภาพรถและการรับจำนำไว้ เมื่อได้หลักฐานชัดเจนจึงขอศาลออกหมายจับพ.ต.ท.โอภาสและพวกที่เหลืออยู่อีก 4 ราย ประกอบด้วยนายพิทยา ศักดิ์กิจจรุง อายุ 40 ปี น.ส.ปรียากร ตั้งศิริวัฒนกุล อายุ 40 ปี ทั้ง 2 คนทำหน้าที่เจรจาต่อรองกับเจ้าของรถ เรียกรับเงินก่อนนำรถไปคืนให้ ส่วนนางศิริพร บางหลวง อายุ 29 ปี และนางวิไล พูลสิทธิ์ อายุ 61 ปี จะตระเวนขอเช่ารถแล้วนำมาจำนำ ด้านพล.ต.ต. วิวัฒน์ ชาญพนา ผบก.ภ.จว.อุบลราชธานี กล่าวว่า เบื้องต้นตั้งคณะกรรมการสอบความผิดของพ.ต.ท.โอภาส พร้อมเสนอความเห็นให้กองบัญชาการตำรวจภูธรภาค 3 มีคำสั่งให้ไปช่วยราชการนอกพื้นที่หรือสั่งพักราชการพ.ต.ท.โอภาสระหว่างต้อง คดีไว้ก่อนแล้ว |
วันเสาร์ที่ 12 มีนาคม พ.ศ. 2554
จับพ.ต.ท.แก๊งเรียกค่าไถ่รถจำนำ
วันอังคารที่ 9 พฤศจิกายน พ.ศ. 2553
แก้ไขจอกระพริบ
you can find how to make it work quite easyly over the forums, this post included.
For the video card :
1. Make sure the restricted driver is installed (in Synaptic search for nvidia-glx-new)
2. Execute this command in a terminal:
sudo dpkg-reconfigure -phigh xserver-xorg
3. Open Restricted Drivers Manager and enable the nVidia driver.
4. Reboot, and you should be good to go.
For the wifi :
mkdir /tmp/wifi
cd /tmp/wifi
wget http://snapshots.madwifi.org/special/madwifi-ng-r2756+ar5007.tar.gz
tar -xvzf madwifi-ng-r2756+ar5007.tar.gz
cd madwifi-ng-r2756+ar5007
make
sudo make install
For the soundcard :
Download/install "linux-backports-modules"
Add this line to /etc/modprobe.d/alsa-base : options snd-hda-intel model=acerI have a aspire 7220 and this technique worked well... Hope this'll work for you too.
วันศุกร์ที่ 5 พฤศจิกายน พ.ศ. 2553
Using Google Calendar, Thunderbird and Lighting to full effect
Using Google Calendar, Thunderbird and Lighting to full effect
One of the best apps available on Windows is MS Outlook, as a complete suite of apps to organize your life, with Mail, to do lists and a calendar application, which allows for scheduling of meetings, and your time, which will communicate happily with your Windows Mobile or Smartphone Device. Allowing you to know what you are doing while both at your PC or away from it. However, being a commercial application, this can be quite a pricey solution, especially, if your are looking for these features to manage yourself, or maybe just a few others.
However it is possible to archive similar results using Windows, or Linux for free.
Being the owner of an Orange M600 Smartphone, and a Linux user, I spent a long time looking over the Internet, as the best way to get the information shared between my Desktop and my PDA phone. and although there are projects out there , SynCE springs to mind, they are not easy to setup.
So I thought i would look at a different way of resolving the issue.. As always, this is not the only way, its just my way.
Issue
- Cross Platform Calendar Connectivity Windows, Linux, Windows Mobile
- Easy to use
The key to my resolution is Google Calendar, which can be accessed easily enough, especially if you already have a gMail account. If however you don’t have a gMail account, you can create your self a Google Account here, which will give you access to the Calendar functionality. Its pretty self explanatory. Once this is setup, its time to look at your mail client, obviously you could just use google calendar, via the web browser in Windows or Linux, but it doesn’t display to well on a PDA.. Also the aim here, is to emulate some of the functionality of Outlook, which allows you to have access to multiple mail accounts in one location.The Email Client
The software I use is Thunderbird, Its my preferred Mail client, as i use both POP and IMAP based mail accounts, this mail client doesn’t however come with any built in calendar function, which is a reason, so many people berate it, and state that “calendar functionality is required before this app can move forward”. One of Thunderbirds strengths however, is, like its cousin Firefox, it works on a plugin system. That is, people have written third party modules, which can be used to enhance the functionality of Thunderbird. And I use 2 of these pluginfrom has an old version, Try downloading Lightening fromSetup The Plugins
Lightning Plugin for Thunderbird: http://www.mozilla.org/projects/calendar/lightning/
Google Calendar Provider: https://addons.mozilla.org/en-US/thunderbird/addon/4631
Quite simply, Lightning provides a calendar interface for Thunderbird, its part of the Mozilla Sunbird project, and helps provide the Schedule interface which standalone Thunderbird is missing.Quote:
Note: The version of the google provider at this time, requires Lightning version 0.7 or higher, and may not work with the one in the Gutsy repository under add/remove, so use the link above to download the latest version.
The magic here, however is the Provider for Google Calendar plugin, which, unlike just adding the necessary links to Thunderbird, to access Google Calendard, not only provides read access, it provides write access as well..Sync the PDA
Install both plugins, and restart Thunderbird, you will then be shown, a Calendar in the left pane, this calendar has 3 tabs Agenda, Todo and Calendars. To setup Google Calendar, click on the Calendar tab.
Click on the New Button, in the Calendar Tab, and you will be given a choice, you need to select, On the Network. Click on Next, there is an option for Google Calendar, select this.
In the Text bar under the Google Calendar you will need to enter the Link URL which allows you to write to your Account, you can find this, buy logging into the Google Calendar account you created earlier.
Create a new Calendar, or if you already have a celedar created, click on the down arrow next to the calendar. And click on Share this Calendar.
You will be taken to a new page, where you will need to click on Calendar Details on the top of this page.
Then Select the XML button, next to the Private Address, this will allow you the read/write access to the calendar, if you need read only access, or wish to share calendards with read only access, use the XML button next to the Public Tab.
When you click on the XML button a URL will be displayed (i’ve edited the whole strin below for security reasons) Copy this URL , and paste it into the Thunderbird Text box, then click on Next.
Give the Calendar a name which you will use in Thunderbird to identify this calendar, and choose a colour, this is the colour which will identify your Google Calendar, if you are using multiple calendars. Then CLick on Next and then Finish.
You will then see your calendar listed as available. you should now be able to add an event in either Thunderbird, or the wEb Interface, and both will update to show the events. You can set reminders, repeat events, and all the usual type of Schedule details.


The next step is to sync the Calendar with the PDA, this is done using the GMobileSync app for Windows Mobile or Smartphones. it requires .NET CF 2.0 which is available for download from the site, and provides not only read access to they Google Calendar, it also provides write access. This means as well as having PDA based access to your existing schedule, you can provide updates from your PDA to your calendar too. The application requires your login ID and password for the Google Calendar site. and works as far as i’m aware over both Wifi and GPRS networks, however i will confess, with UK prices as they are for Data over GPRS i’ve only tried Wifi. The Sync is a manual operation, and not automatic (yet)Final Thoughts?
So what do we have? quite simply a free, Open source based Mail and personal schedulling system, which can be accessed, over muliple platforms, Windows Mobile, Windows and Linux (not sure about OSX). Providing access to multiple mail accounts, using POP or IMAP. Read/Write Calendar access on Desktop, Laptop or PDA.. There is also ToDo list functionality available. and all this can be accessed via a Web Interface. Now thats value for money.. Now if i could get this working with Open Xchange as well… bye bye M$ Exchange.
วันพฤหัสบดีที่ 4 พฤศจิกายน พ.ศ. 2553
focus writer
FocusWriter 1.3.0 Released – Distraction free writing on Ubuntu
For those of you unaware, I received my Bachelors in Theater Arts just a few months ago. I wrote a number of plays and sketches, both for classes and to actually be produced, and I wrote all of them on Ubuntu.
Unfortunately I was never able to settle down into anything more specialized than OpenOffice. While certainly full featured, typing in nothing more than a Word Processor is not, for everyone, entirely conducive to the writing process. Distractions abound, and it is difficult to really focus on what you’re doing even if you have the will power, simply because of the wide range of flashing indicators and bouncing icons and such. Even the OpenOffice interface offers formatting and other distractions. As many of you are fully aware, it takes 2 clicks to get something as simple as a word count, which is horribly distracting to have to change your flow to grab the mouse and click the menu. I turned to writing drafts by hand, and only used the computer for second and third drafts.
However, recently I’ve been turned onto writing software with little or no interface available. We’ve written about PyRoom before, a simple writer written in Python. I actually literally just installed it again last night, but today another bit of software showed up in our inbox, FocusWriter.

FocusWriter suits me a bit more, because of a few key added features that is has over PyRoom and other available software.
Featured and Yet Simple

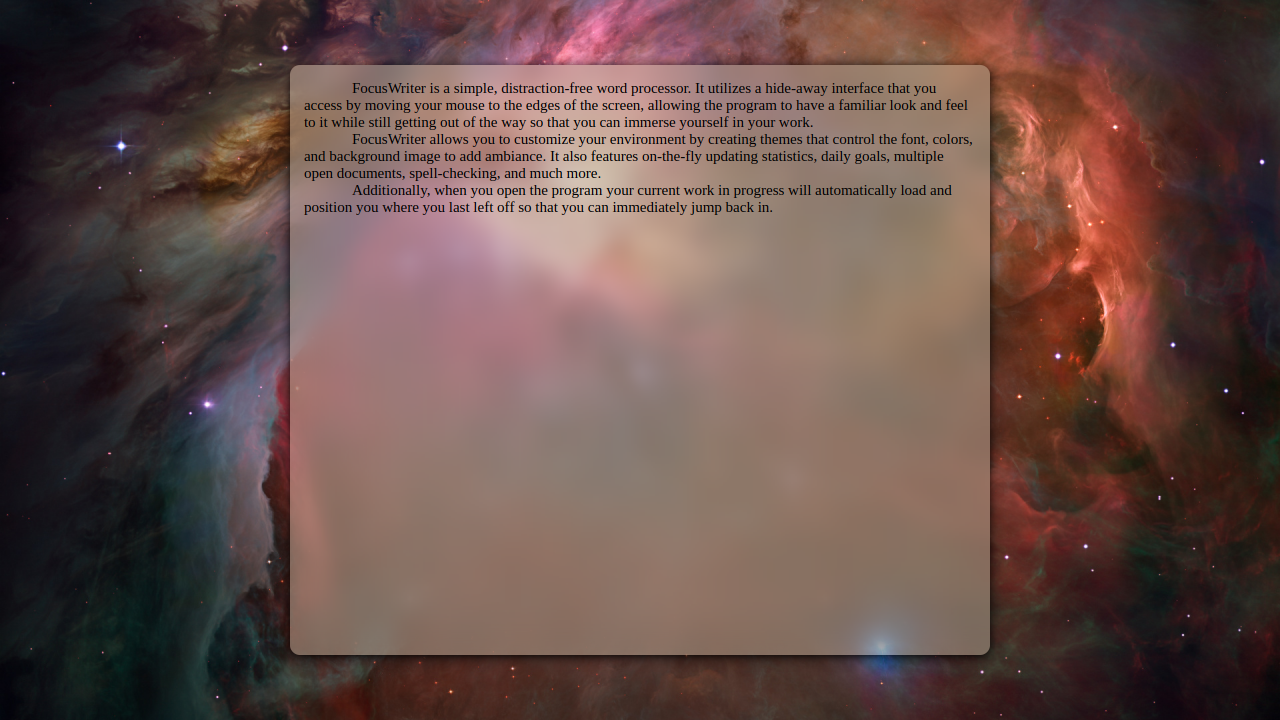
The first time you launch FocusWriter, you get a plain, empty grey screen. While not exactly the most attractive colors to start with, these are totally changeable. Unfortunately, how to change things like this is not immediately apparent. I tried just about every key combo that popped into my mind, but couldn’t find any controls. Once I stopped being stubborn and actually read the instructions on the website, I realized that the controls were not hidden by a key press, but by simply tossing your mouse at the top or bottom of the screen.

This, I think, is rather clever, although it took me long enough to figure it all out.
There are a number of nice little touches to this simple interface. When the mouse is brought to the bottom, you get this view:

This gives you word count, page count, paragraph count, and character count, as well as percentage of Daily Goal accomplished and the time. All the things you might need, but not in your face distracting you. This is great, as when you need this info, it’s very easy to get out, but is otherwise out of sight.

Also cool is that there is the ability to add basic formatting. Often this is left out of apps like this to avoid any distraction, but sometimes you need some of the basics, and FocusWriter delivers (apparently added in the most recent version only)
The Rough Edges
Like any app, there are a few areas that I think could use a bit of improvement.
First up, when I first installed FocusWriter there was absolutely nothing. No tutorial, no hints, no nothing. I don’t know if there is supposed to be instructions that just aren’t there and it’s a bug or what, but help out the user and drop some text in there. If it’s just me and it installed funny, then ignore this paragraph everyone.
Secondly, while there is a button for installing themes (the source of which I couldn’t particularly found) there are none included besides the bland grey. While the point is to keep you from being distracted, something that’s at least pleasant to look at would be nice.

The fact that the included color palette looks like vomit doesn’t help, as it means you have to totally distract yourself for a bit screwing around with colors.
Speaking of included palette:

Ew. For what reason are those colors available?
However, those are minor minor complaints about an otherwise great app. The newest version literally came out NOW, as in the 23rd, so it is up to date and ready to go.
Features:
Perhaps in it’s coolest feature, FocusWriter is available in Mac, Windows, and Linux all downloadable from their website. For Ubuntu, there is an available PPA, and you can install from PPA like so:
Unfortunately I was never able to settle down into anything more specialized than OpenOffice. While certainly full featured, typing in nothing more than a Word Processor is not, for everyone, entirely conducive to the writing process. Distractions abound, and it is difficult to really focus on what you’re doing even if you have the will power, simply because of the wide range of flashing indicators and bouncing icons and such. Even the OpenOffice interface offers formatting and other distractions. As many of you are fully aware, it takes 2 clicks to get something as simple as a word count, which is horribly distracting to have to change your flow to grab the mouse and click the menu. I turned to writing drafts by hand, and only used the computer for second and third drafts.
However, recently I’ve been turned onto writing software with little or no interface available. We’ve written about PyRoom before, a simple writer written in Python. I actually literally just installed it again last night, but today another bit of software showed up in our inbox, FocusWriter.
FocusWriter suits me a bit more, because of a few key added features that is has over PyRoom and other available software.
Featured and Yet Simple

The first time you launch FocusWriter, you get a plain, empty grey screen. While not exactly the most attractive colors to start with, these are totally changeable. Unfortunately, how to change things like this is not immediately apparent. I tried just about every key combo that popped into my mind, but couldn’t find any controls. Once I stopped being stubborn and actually read the instructions on the website, I realized that the controls were not hidden by a key press, but by simply tossing your mouse at the top or bottom of the screen.

This, I think, is rather clever, although it took me long enough to figure it all out.
There are a number of nice little touches to this simple interface. When the mouse is brought to the bottom, you get this view:
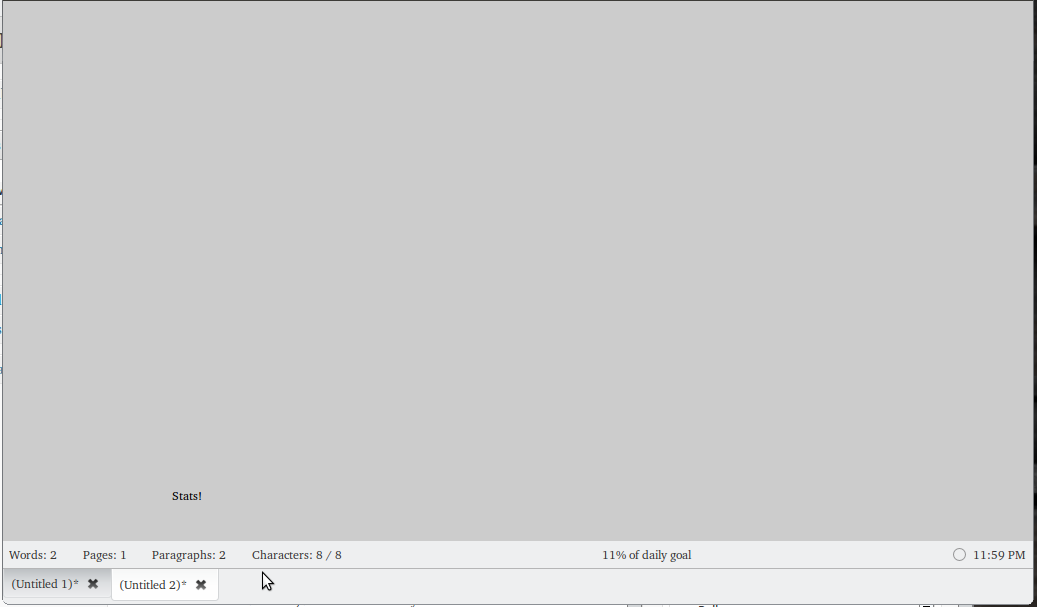
This gives you word count, page count, paragraph count, and character count, as well as percentage of Daily Goal accomplished and the time. All the things you might need, but not in your face distracting you. This is great, as when you need this info, it’s very easy to get out, but is otherwise out of sight.

Also cool is that there is the ability to add basic formatting. Often this is left out of apps like this to avoid any distraction, but sometimes you need some of the basics, and FocusWriter delivers (apparently added in the most recent version only)
The Rough Edges
Like any app, there are a few areas that I think could use a bit of improvement.
First up, when I first installed FocusWriter there was absolutely nothing. No tutorial, no hints, no nothing. I don’t know if there is supposed to be instructions that just aren’t there and it’s a bug or what, but help out the user and drop some text in there. If it’s just me and it installed funny, then ignore this paragraph everyone.
Secondly, while there is a button for installing themes (the source of which I couldn’t particularly found) there are none included besides the bland grey. While the point is to keep you from being distracted, something that’s at least pleasant to look at would be nice.
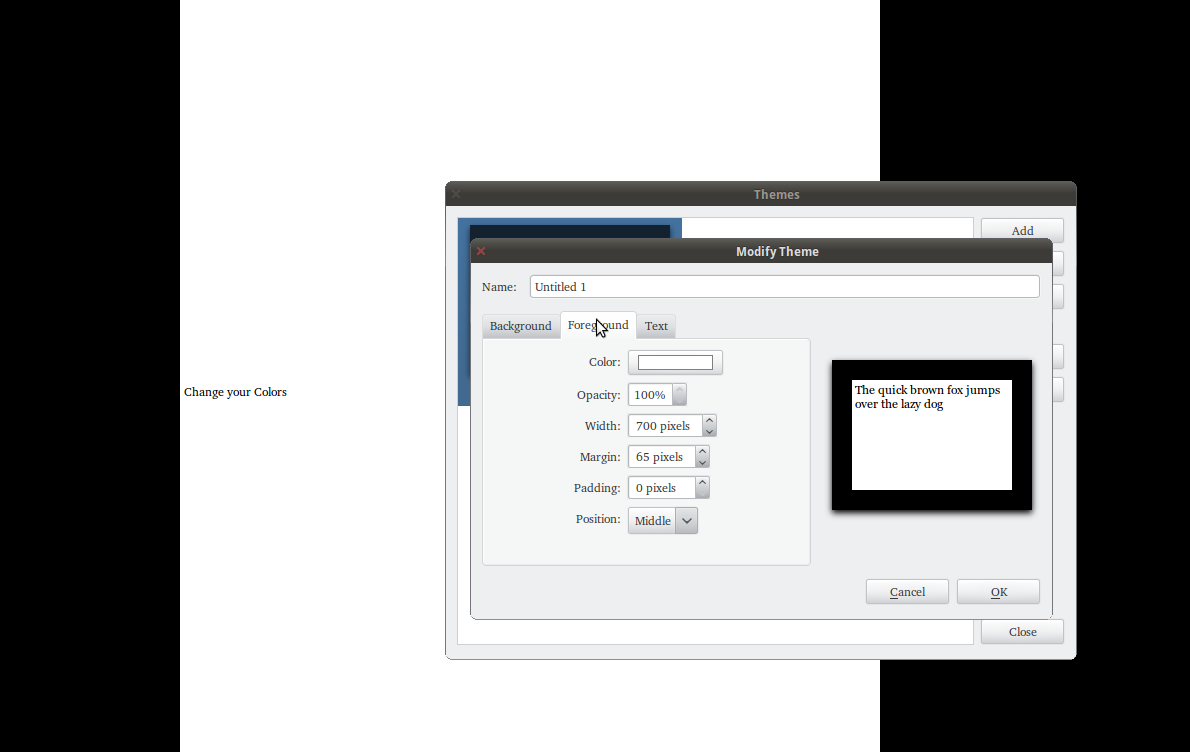
The fact that the included color palette looks like vomit doesn’t help, as it means you have to totally distract yourself for a bit screwing around with colors.
Speaking of included palette:

Ew. For what reason are those colors available?
However, those are minor minor complaints about an otherwise great app. The newest version literally came out NOW, as in the 23rd, so it is up to date and ready to go.
Features:
- Hiding interface
- Themes
- Live Statistics
- Daily Goals (time and word count)
- Timers and alarms
- Very adjustable interface
- Spell Check as you type
- Dictionary support
- Multiple documents can be open in tabs
Perhaps in it’s coolest feature, FocusWriter is available in Mac, Windows, and Linux all downloadable from their website. For Ubuntu, there is an available PPA, and you can install from PPA like so:
- sudo add-apt-repository ppa:gottcode/gcppa
- sudo apt-get update
- sudo apt-get install focuswriter
วันพุธที่ 3 พฤศจิกายน พ.ศ. 2553
การติดตั้ง fonts ใน ubuntu
ฟอนต์ที่ควรติดตั้ง
ttf-ftpl
ttf-SIPA-angsana
ttf-thai-siampradeh
ttf-tepc
ttf-thaifont-abc
การติดตั้ง fonts
ttf-ftpl
ttf-SIPA-angsana
ttf-thai-siampradeh
ttf-tepc
ttf-thaifont-abc
การติดตั้ง fonts
install ที่ /usr/share/font/truetype/thai
$sudo chmod 644 /usr/share/fonts/truetype/thai/*.ttfแล้วก็ sudo fc-cache -fv
THAI OS
เกี่ยวกับ
Thai OS เป็นซอฟต์แวร์ระบบปฏิบัติการที่สามารถใช้งานได้บนเครื่องคอมพิวเตอร์ทั่วไป โดย SIPAเห็นว่าการที่ประชากรในชาติจะต้องใช้ซอฟต์แวร์ระบบปฏิบัติการที่เป็น ซอฟต์แวร์เชิงพานิชนั้น
นอกจากจะสิ้นเปลืองและไม่ปลอดภัยแล้ว เราจะไม่สามารถใช้งานได้อย่างยั่งยืนอีกด้วย ทาง SIPA
จึงพัฒนาระบบปฏิบัติการ Suriyan ที่เป็นระบบปฏิบัติการโอเพนซอร์สทั้งระบบขึ้นมาให้ใช้งาน
เพื่อเป็นทางเลือกในการใช้งานคอมพิวเตอร์ที่ต้องการความประหยัด และความปลอดภัย
ที่สามารถใช้งานได้อย่างยั่งยืน จากความสำเร็จในการพัฒนา Suriyan การตอบรับที่ดีจากผู้ใช้
SIPA จึงประกาศการพัฒนา Thai OS เพื่อให้เข้ากับคนไทยได้มากขึ้น
ความเป็นมาของ Thai OS
Suriyan เป็นโครงการภายใต้การดูแลของสำนักงานส่งเสริมอุตสาหกรรมซอฟต์แวร์แห่งชาติ(องค์การมหาชน) หรือ ซิป้า ซึ่งเริ่งโครงการเมื่อปี พ.ศ. 2549 โดยเป็นโครงการพัฒนาลินุกซ์
เซิร์ฟเวอร์พร้อมใช้ (instant server) ให้ชื่อว่า Suriyan GNU/Linux การพัฒนา Suriyan
ในแง่มุมของการใช้งานเซิร์ฟเวอร์ยังไม่เเพียงพอ อีกทั้งการตอบรับยังไม่กว้างพอ ทำให้
การพัฒนาโครงการ Suriyan GNU/Linux ล่าช้าลงและลดบทบาทการพัฒนาในเวอร์ชัน
1.0 สำหรับโครงการ Suriyan GNU/Linux ยังสามารถดาวน์โหลดได้ที่ suriyan.org
ในปี 2550 KDE วางแผนการออกรุ่น 4.0 อีกทั้งยังขาดการปรับปรุงภาษาไทยใน KDE 4.0 Suriyan
จึงได้เบนเข็มไปเป็นโครงการพัฒนาภาษาไทยใน KDE โดยใช้ Kubuntu เป็นต้นน้ำและพัฒนา
ไลบรารีภาษาไทย เพื่อรองรับการแสดงผลและการพิมพ์ภาษาไทยในเบื้องต้น และส่ง patch เข้าไป
ที่ต้นน้ำ (KDE) เนื่องจากการเปลี่ยนแปลงภายในของ KDE การควบรวมทีมพัฒนา KDE เข้ากับทีม
Nokia ส่งผลในการรับ patch ล่าช้าและ patch ส่วนใหญ่ไม่ได้ถูกรับเข้าไปยังต้นน้ำ การพัฒนา
ภาษาไทยบน KDE และการพัฒนาภาษาไทยใน Suriyan ในรุ่นถัดมาจึงล่าช้าลงไปอีก
ในปี 2551 ทีมงาน Thai Open Source.org ซึ่งประกอบด้วยนักพัฒนาอิสระและชุมชนระบบปฏิบัติการ
โอเพนซอร์ส เห็นว่าโครงการ Suriyan ควรปรับปรุงและจัดทำออกมาให้เป็นรูปธรรมที่ชัดเจน ต้นปี 2552
จึงได้มีการวางโครงสร้างและการพัฒนาอย่างค่อยเป็นค่อยไป โดยศึกษาการพัฒนาจากระบบปฏิบัติการ
จากชุมชน Ubuntu ในประเทศไทย ซึ่งส่งผลให้ Suriyan เลือกใช้ Ubuntu ที่ใช้ GNOME เป็น
Windows Manager หลัก และเลือกใช้ Club Distro Prompt Edition 9.05 เป็นต้นแบบในการพัฒนา
Suriyan 52.0 ในเดือนตุลาคมถัดมา ปัจจุบัน Suriyan ใช้ Ubuntu เป็นต้นแบบในการพัฒนา โดยเพิ่มเติม
แอพลิเคชั่น ฟอนต์ภาษาไทย ปรับปรุงเคอร์เนล และส่วนติดต่อผู้ใช้ เพื่อให้เกิดความง่าย ซึ่งส่งผลให้ผู้ใช้ที่
ต้องการเปลี่ยนจาก Windows มาใช้งาน Suriyan ได้ง่ายมากขึ้น Suriyan Desktop พัฒนาต่อเนื่องเรื่อย
มาจนถึงรุ่น 53.04
การตอบรับที่ดีจากผู้ใช้ SIPA จึงประกาศการพัฒนา Thai OS โดยเพิ่มความสามารถเพิ่มเติมให้กับระบบ
ปฏิบัติการ Suriyan เดิมเพื่อให้เข้ากับคนไทยได้มากขึ้น เพิ่มฟอนต์ภาษาไทยมาตรฐานกว่า 40 ฟอนต์
ส่วนขยายที่จำเป็นของ FireFox ส่วนขยายเพิ่มเติมของ OpenOffice.org 3.3 พร้อมโปรแกรมสำรองข้อมูล
และพื้นเก็บข้อมูลเชื่อมโยงกับ Cloud Storage เพื่อเพิ่มพื้นที่สำหรับเก็บไฟล์ที่มากขึ้น ปลอดภัยมากขึ้น
Thai OS พัฒนาและดูแลโดย
สำนักงานส่งเสริมอุตสาหกรรมแห่งชาติ (องค์การมหาชน)เลขที่ 120 หมู่ที่ 3 ชั้น 9 อาคารรวมหน่วยงานราชการ บี ศูนย์ราชการเฉลิมพระเกียรติ ๘๐ พรรษา ๕ ธันวาคม ๒๕๕๐
ถนนแจ้งวัฒนะ แขวงทุ่งสองห้อง เขตหลักสี่ กรุงเทพมหานคร 10210
โทรศัพท์ :
0-2141-7100 begin_of_the_skype_highlighting 0-2141-7100 end_of_the_skype_highlighting
แฟกซ์ :
0-2143-8051 begin_of_the_skype_highlighting 0-2143-8051
ที่มา
วันอังคารที่ 2 พฤศจิกายน พ.ศ. 2553
How to ติดตั้ง Bisigi theme
Bisgi themes have always been a cut above the rest and they have already released nearly 14 beautiful themes for Ubuntu/Gnome until now. Split is the brand new theme introduced by Bisigi and from the looks of it, Split is definitely worth a try. Introduction of split theme takes the total count of Bisigi themes to 15 now!
 How to Install Bisigi Themes in Ubuntu Maverick, Lucid via Bisigi PPA?

- Open Terminal and copy-paste the following line into Terminal.
sudo add-apt-repository ppa:bisigi && sudo apt-get update
- Now, Install all new Split theme. Just copy-paste the following command in Terminal.
sudo apt-get install split-theme
- Done. There you have it, the newest addition into the ever growing list of stunning themes done by Bisigi.
- But if you want to install all the 15 themes in one go, here is what you need to do.
sudo apt-get install bisigi-themes
- Now, if you don't want to install all the 15 themes initially, here are the commands to install them individually. Preview the themes here.
AquaDreams:              sudo aptitude install aquadreams-theme
Ubuntu Sunrise:          sudo apt-get install  ubuntu-sunrise-theme
Bamboo-Zen:              sudo apt-get install bamboo-zen-theme
Step into Freedom:     sudo apt-get install step-into-freedom-theme
Tropical:                sudo apt-get install tropical-theme
Exotic:                  sudo apt-get install exotic-theme
Balanzan:                sudo apt-get install balanzan-theme
Wild Shine:              sudo apt-get install wild-shine-theme
Infinity:                sudo apt-get install infinity-theme
Showtime:                sudo apt-get install showtime-theme
Orange:                  sudo apt-get install orange-theme
Ellanna:                 sudo apt-get install ellanna-theme
AirLines:                sudo apt-get install airlines-theme
Eco:                     sudo apt-get install eco-theme
- Done. In my opinion, new split theme looks even more elegant when used in combination with Nautilus Elementary.
Also Read ..
สมัครสมาชิก:
บทความ (Atom)